Canning your own cranberry sauce is easy and it is so delicious! This homemade cranberry sauce is so much better than storebought!

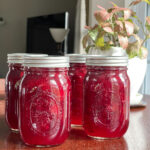
There is something so satisfying about filling your pantry (cantry) with your home canned products. One of the prettiest has to be this whole berry cranberry sauce!
I love that I can easily reach for a jar to serve as a quick side dish, spread on a sandwich, serve with cheese on a fancy charcuterie board, and it's amazing on a bagel with cream cheese!
Water bath canning vs pressure canning.
As a basic overview, you use water batch canning for high acidic foods and pressure canning for low acidic foods.
Water bath canning can be done in any large pot that will allow you to cover your jars by 1 inch of water. Pressure canning requires a pressure canner, either stove top or an electric digital pressure canner.
I have an electric digital pressure canner that I can also water bath can in and that is what I used for this sauce. However, you can make the sauce in a large pot for traditional water bath canning.
General Steps for Water Bath Canning
Note - I am giving the general steps for water bath canning - you will need to buy a canning book to thoroughly understand canning and to get some fabulous recipes to try. I will link to a good canning book in the recipe card. Note - times may change because of your altitude, these instructions are for elevations less than 1,000ft.
Prepare your jars, lids, and bands by washing in warm soapy water. If the recipe's processing time is 10 minutes or less, the jars will also need to be sterilized. I usually run mine through the dishwasher, you can also sterilize them right in your canner. Place the rack in the pot, place the jars on the rack, and completely cover them with water, by 1 inch. Put a lid on the pot and bring to a boil. Boil for 10 minutes.
Heat the jars - if you sterilized them in the pot, just turn the heat off and let them sit in the warm water, while you prepare the recipe. Otherwise, place the rack in the pot, and place the jars on the rack, fill about halfway with water or until the jars are covered by 1 inch of water. Bring to a simmer and keep the jars warm, while you prepare your recipe.
Prepare your recipe - while the jars are heating in the pot, prepare your recipe. If your recipe is particularly time consuming, you can change the order of these steps, to prepare the jars a little before your recipe will be complete.
Fill the jars - remove the jars from the pot, using a jar lifter and pour out the water. Using a funnel, fill the jars with food to the required headspace. Use a small plastic spatula, a chopstick, or a specific canning debubbler and headspace measure tool by running it along the inside edge of the jar. You want to try to get the air bubbles out. Add or remove food to adjust to the proper headspace.
Place the lids - using a clean damp cloth wipe the rims of the jars. You want to remove any food that might have spilled or dripped. Place the lid on the jar and screw on the bands to fingertip tight. You don't want to overtighten the bands because air needs to be able to be released.
Jars in canner - lower the jars into the canner using the jar lifter. The water should still be hot, but not boiling. If the water does not cover the jars by 1 inch, add boiling water until it does. An electric teakettle is perfect for this.
Process the jars - put a lid on the pot and bring the water back to a full boil. Once it has reached a full boil, start the timer for the processing times of your recipe. Once the timer goes off, turn off the heat, remove the lid and let everything rest for 5 minutes. Some people take the jars right out as soon as the timer beeps, I like to let it rest for 5 minutes.
Remove the jars - using your jar lifter, lift the jars straight up and place on a towel on your counter. Do not touch the jars or tilt them. Let the jars sit, undisturbed for 24 hours.
Test the seals and store - after that time, test the seals to see if the middle of the lid is indented, it should not pop up or down. You can also remove the bands and pick up the jars by the lid, it should not come lose. If any jars did not seal, store in the fridge and eat within a few days. Those that sealed, remove the bands, wipe down the jars and store in a cool, dark location.
Water bath canning with electric pressure canner.
I gave you the instructions above for general water bath canning, because not everyone has an electric pressure canner. I have a 17qt Presto Digital Electric Pressure Canner which allows me to pressure can and water bath can.
I follow the same basic steps as above, but they are slightly different because it's all done in the electric canner.
Again, I am going to give basic instructions for my specific canner, you will want to follow the instructions that come with your appliance.
Prepare your jars, lids, and bands by washing in warm soapy water. If the recipe's processing time is 10 minutes or less, the jars will also need to be sterilized. I usually run mine through the dishwasher, you can also sterilize them right in your canner. Place the rack in the pot, place the jars on the rack, and completely cover them with water, by 1 inch. Put a lid on the pot and bring to a boil. Boil for 10 minutes.
Prepare the canner. Place the rack in the bottom of the canner's pan and add 3 quarts of water, which will go up to the fill line. Turn the knob so that it switches from Pressure Can to Boiling Water Can. Set the processing time. Press the arrow and it will tell you to insert the jars.
Warm the jars. Fill the jars half full with water and place on the canning rack. Remove the regulator from the cover (you only use this when pressure canning.) Place cover on canner turn to lock and then lower the sensor arm and turn green latch to lock in place. Press the arrow again and your canner will begin warming your jars.
Prepare your recipe. Have a tea kettle or boiling water ready to add to the canner.
Fill jars. The canner will beep and the Fill Jars lights up. Unlock and remove cover. Remove the jars one at a time and dump out the water. Fill the jars per your recipe, wipe the rims, add lids and bands and screw to finger tip tight. Place the filled jar back in the canner and repeat with the other jars. Add boiling water to the canner until the water is 1 inch above the jars.
Canning Phase - Place cover back on canner and lock. Lower the sensor arm, turn the green latch and lock into place. Press the arrow again and Heat lights up. Once the water heats up to temperature, it will change and say Canning. When it's down canning, it will beep and then go into Cool phase.
Cool Phase and Done - When the canner says cool, unlock and lift the sensor arm and carefully remove the lid for the cooling phase. When the cool phase is done, the canner will beep and say Done. Press and hold the X button for 3 seconds to reset.
Remove the jars - using your jar lifter, lift the jars straight up and place on a towel on your counter. Do not touch the jars or tilt them. Let the jars sit, undisturbed for 24 hours.
Test the seals and store - after that time, test the seals to see if the middle of the lid is indented, it should not pop up or down. You can also remove the bands and pick up the jars by the lid, it should not come lose. If any jars did not seal, store in the fridge and eat within a few days. Those that sealed, remove the bands, wipe down the jars and store in a cool, dark location.
Let's can some cranberry sauce!
Using the instructions above for using a pressure canner to water bath can, here are a few photos of my step by step process of the Whole Berry Cranberry Sauce recipe from The Ball Complete Book of Home Preserving.

In a large saucepan combine sugar and water. I am using unbleached sugar, which is why it looks darker. Bring to a boil, stirring to dissolve the sugar. Boil hard for 5 minutes.

Add the cranberries and bring back to a boil. Reduce the heat and boil gently until the cranberries have popped and the liquid forms a sheet on the back of a metal spoon. This will probably take about 15 minutes.
Stir in the orange zest for the last few minutes of cooking.

Ladle the hot sauce into hot jars, leaving ¼ inch head space. Remove air bubbles, adjust head space if needed.
Wipe the rims, place the lids on the jars, and add the bands. Screw bands on to fingertip tight.

Place jars in your canner or pot and process for 15 minutes. See instructions above for specific directions for using a pot or a pressure canner for water bath canning.
When finished processing, remove jars carefully and let sit for 24 hours undisturbed before checking seal.
Remove the bands on the sealed jars and store in a cool, dark place. Any jars that didn't seal should be placed in the fridge and eaten.

This was a great way to use up some cranberries that I had in the fridge. Now that I have jars of it, I use it for many things. It's especially good on turkey sandwiches, heating it up and using as a glaze for chicken, using it in a sauce for meatballs, stirring into yogurt - so many options!
Winter canning is fun, it's a more leisurely pace, and you're not staring down mounds of produce like in the summer.
More winter canning ideas:


Recipe.
**As an Amazon affiliate I earn from qualifying purchases.
Cranberry Sauce
Ingredients
- 4 cups granulated sugar
- 4 cups water
- 8 cups fresh cranberries
- 1 orange zested, optional
Instructions
- Prepare canner, jars, and lids (using a canning book or the instructions in this post.)
- In a large saucepan, combine water and sugar. Bring to a boil over high heat, stirring to dissolve sugar. Boil hard for 5 minutes.
- Add the cranberries and return mixture to a boil. Reduce heat and simmer gently for about 15 minutes. All the berries should have burst and the liquid forms a sheet on the back of a metal spoon. Stir in the orange zest during the last few minutes of cooking.
- Ladle in the hot sauce into hot jars leaving ¼ inch headspace. Debubble and add more liquid if needed. Wipe the rims of the jar and center the lids. Screw on the bands to fingertip tight.
- Place the jars in the canner and process for 15 minutes - using instructions either for either waterbath canning in a pot, a pressure canner, or a steam canner.
- Remove the jars to a towel and let sit undisturbed for 24 hours. Remove the rims from the sealed jars and store. Any unsealed jars should be placed in the fridge and eaten.


Leave a Reply